To make a product video, start from the question a shopper has before buying, plan a short list of shots that shows the answer, film them with a phone on a stand beside a window, and edit so the product appears in the first second and every claim is visible on screen. Then export a separate version for each place the video will run, because an Amazon listing, a Shopify product page and a vertical social feed each have their own rules. You need the product, a phone, something to hold it steady, daylight and a plain surface. Everything else is an upgrade.
This guide covers ecommerce product videos for physical products, worked through one example from plan to export: a travel mug with a locking lid. The editing steps are shown in ChatCut and described so you can follow them in any editor, and the platform specs were checked in November 2026. If you can’t film a presenter or a location, there is also an AI-assisted route, with an honest account of what it can’t do.
How to make a product video, step by step
- Pick one buyer question. “Will it leak?”, “How big is it?” or “What’s in the box?” decides which kind of video you are making.
- Write a shot list. Five to eight shots, each one proving one thing.
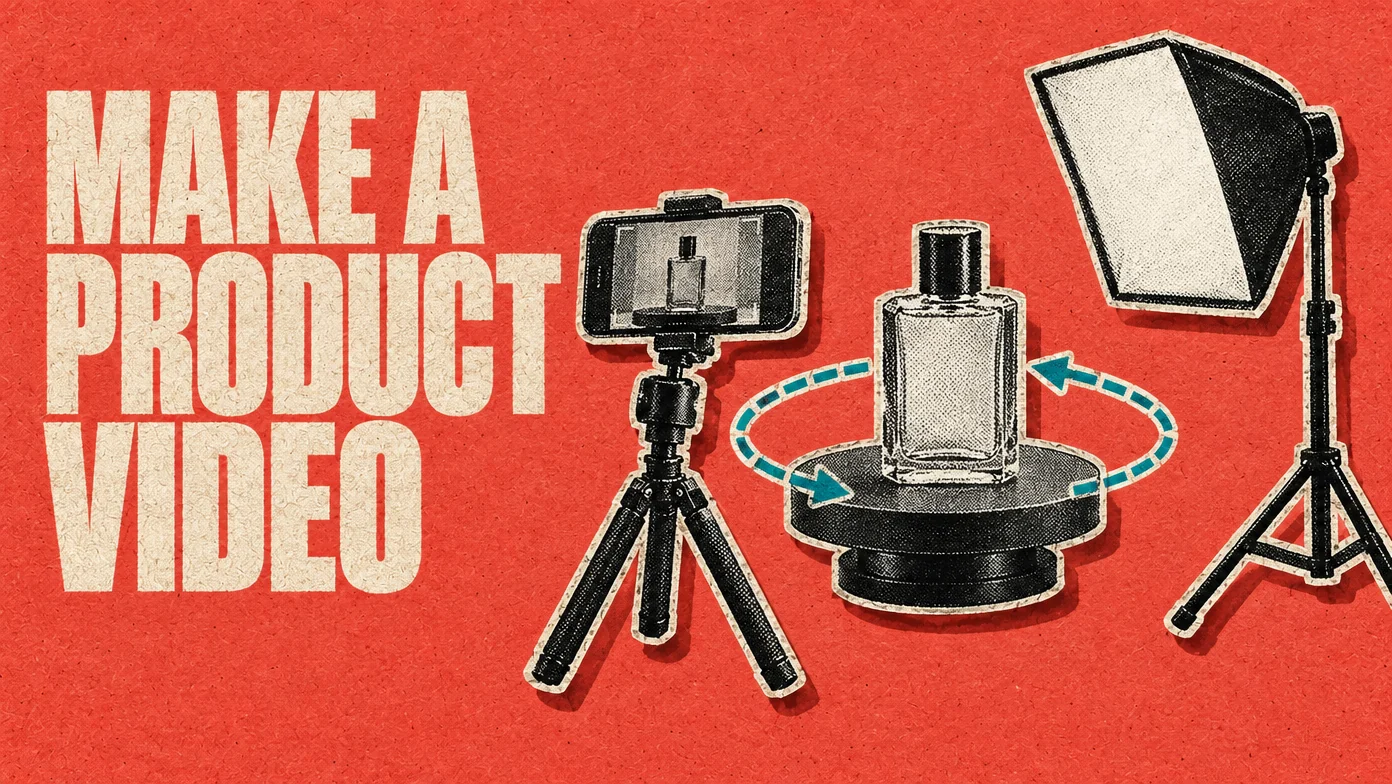
- Set up a tabletop studio. Side light from a window, a white card opposite, a plain background, the phone on a stand.
- Film each shot wide, medium and close, holding still for two seconds before and after every action.
- Edit for a viewer with the sound off. Product in the first second, cuts on movement, short factual text, music under the product’s own sounds.
- Export one version per destination, then watch each on a phone before it goes live.
Choose the product video type from the buyer’s question
Product videos are usually named by format: demo, unboxing, 360, lifestyle. It is more useful to name them by the question they answer, because the question tells you what has to be on screen. Amazon’s upload form works the same way. When you add a video to a listing, you tag it as a product overview, unboxing, how-to, setup, troubleshooting or brand story video (Sell on Amazon).
The common types below double as a list of product video ideas. Each answers one question and depends on one kind of shot:
- Feature demo or how-to. “How does it work, and does it really do that?” Hands operate the feature at real speed and the video ends on the visible result. It works on the listing, and a shorter cut works as an ad.
- 360 view or packshot. “What does it look like from every side?” One slow turn on a turntable against a plain background, usually silent. It suits a looping video on the product page.
- Unboxing. “What will I actually get?” Every item that ships, laid out, small parts included. The ASMR version slows the handling down and lets the sound of the packaging carry it.
- Scale and fit. “How big is it, and will it fit me or my space?” The product in a hand, on a body, next to an everyday object or in the place it will live. Apparel, bags and furniture need this most.
- Lifestyle or in use. “Is this for someone like me?” A real setting and a real moment of use. It works in feeds but proves little on its own, so pair it with a demo.
- Problem and result. “Will it fix my problem?” The problem, the product in use, then the result. Show only results you can repeat and that your listing already claims.
- Launch or reveal. “What’s new?” The video holds the product back for a few seconds, then reveals it. A mystery box is one way to build that suspense; the Mystery-box product reveal Skill is built around it. It needs a reveal worth waiting for.
- Customer review. “Do people like me like it?” Real customers, filmed or sent in with permission. An actor or a generated presenter is not a customer and shouldn’t be presented as one.
If you can make only one video, make the feature demo. It answers the question that photos can’t, and the same footage cuts down into ads, social posts and the B-roll for every other type.
Plan a shot list that proves one benefit
Before you film, list every claim you want the video to make, then ask what a skeptical shopper would need to see to believe each one. Each answer becomes a shot. A claim with no shot either gets one or leaves the video and stays in the listing text.
Here is that process for an invented product: a 16 oz insulated travel mug with a locking lid, sold on Amazon and in its own Shopify store. The shopper’s main worry is will it leak in my bag? So “leak-proof” becomes the locked mug shaken upside down over a white paper towel in one continuous take, “16 oz” becomes a pour from a measuring jug with the markings in frame, and “one-thumb lock” becomes a macro shot of the slider with the click recorded. Some claims don’t fit in 30 seconds. “Keeps coffee hot for hours” needs a thermometer filmed in the morning and again in the afternoon with a clock in frame; without that, it stays in the listing text.
Then put the shots in an order that opens with the worry and closes with the answer:
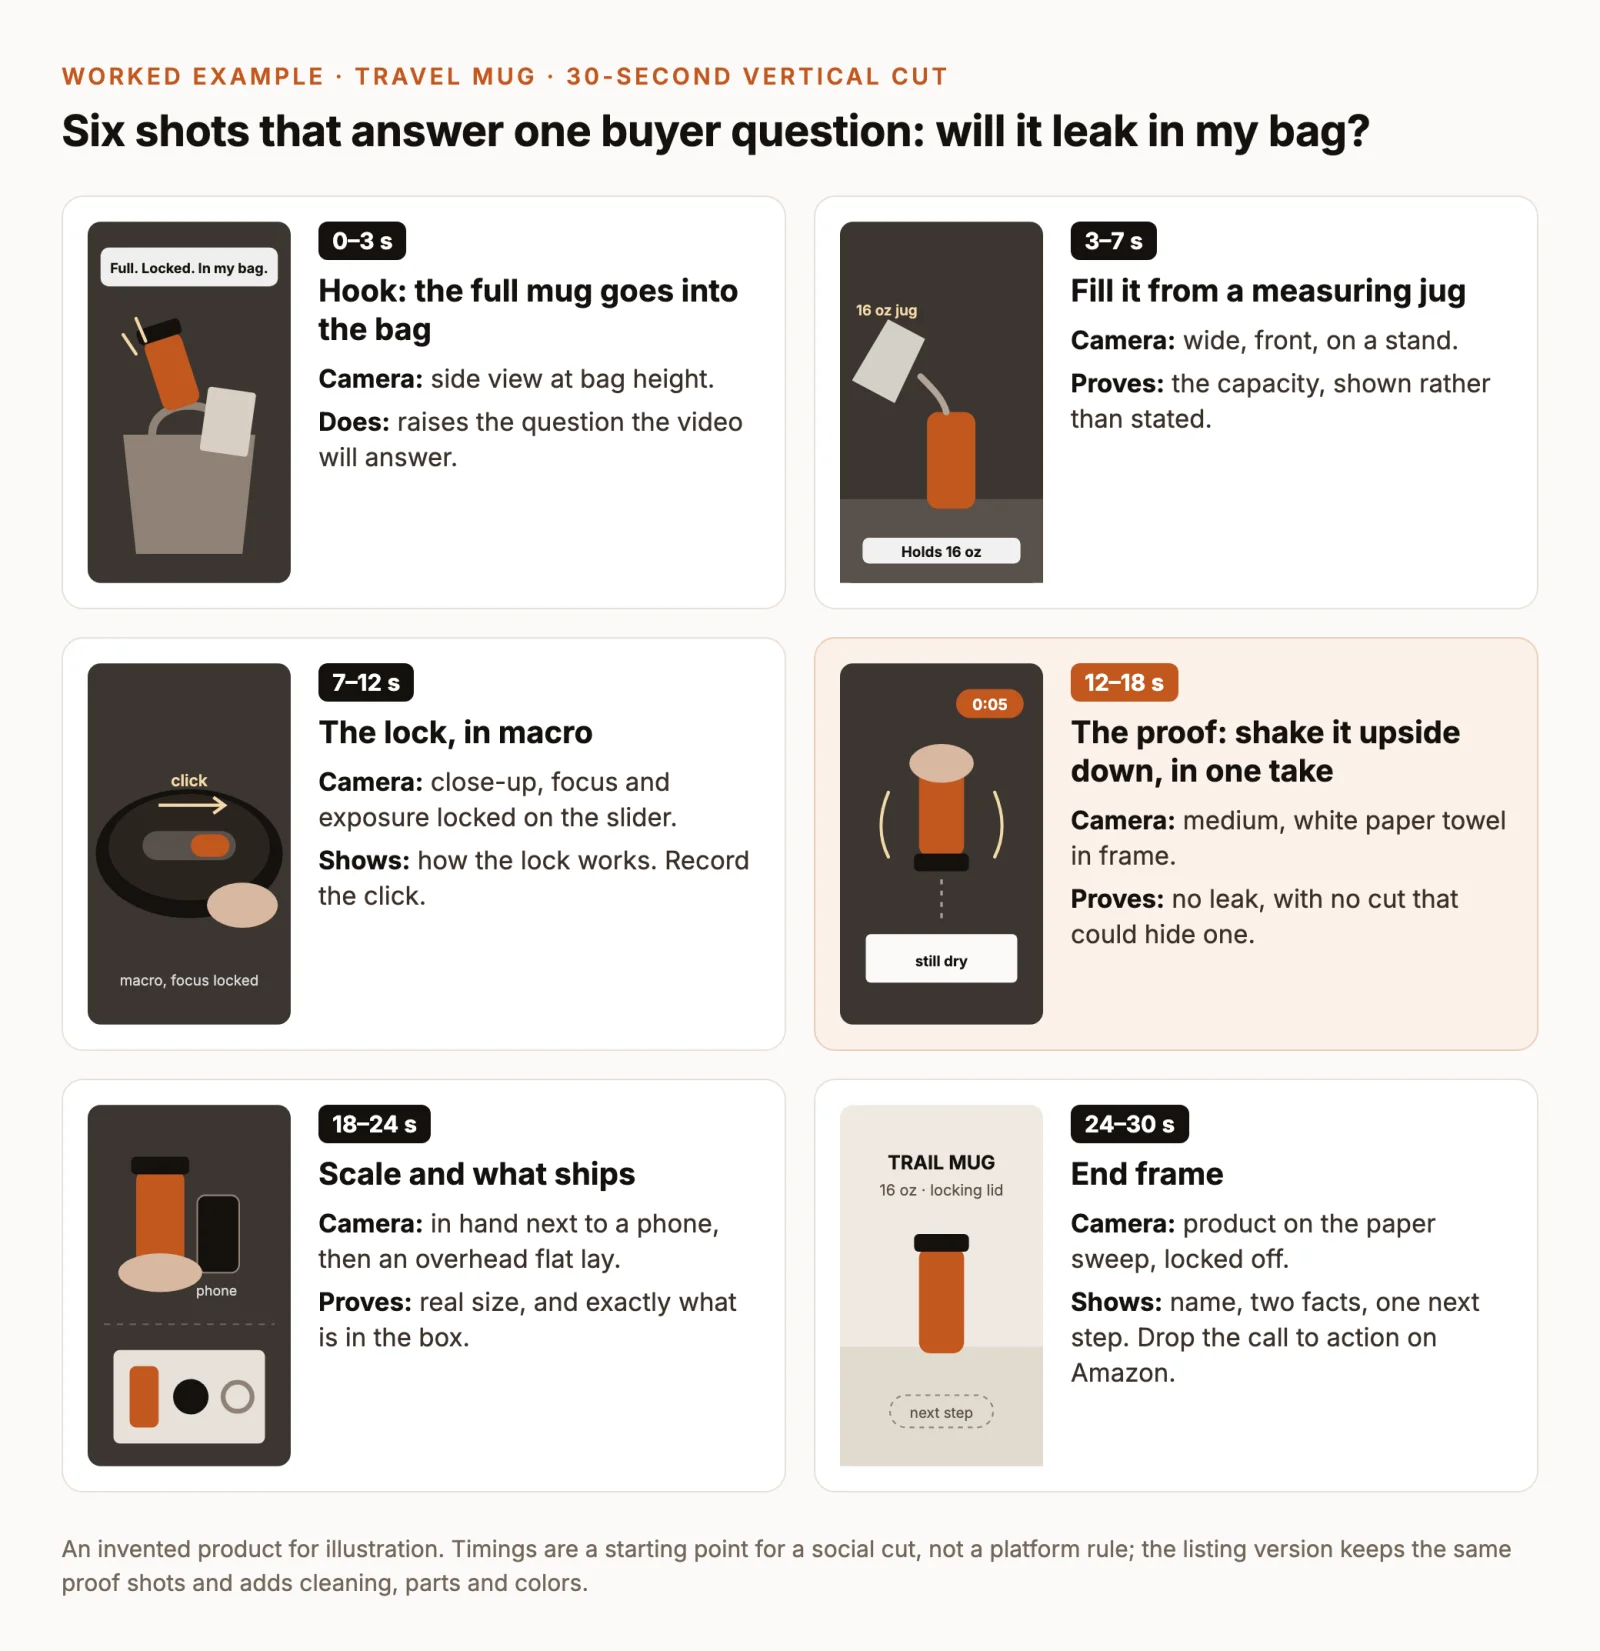
- Hook, 0–3 s: the full mug goes into the bag. Side view at bag height, with the text “Full. Locked. In my bag.” This raises the question; the answer comes in shot 4.
- Fill, 3–7 s: pour 16 oz from a measuring jug. Wide shot from the front, the phone on a stand. Label: “Holds 16 oz”.
- Lock, 7–12 s: a thumb slides the lock. Macro, with focus and exposure locked on the slider. Record the click with the microphone close.
- Proof, 12–18 s: shake it upside down over a paper towel. Medium shot, real speed, no cut, ending on the dry towel. A cut inside a demonstration is exactly where viewers suspect a trick.
- Scale and contents, 18–24 s. The mug in a hand next to a phone, then in a cup holder, then an overhead flat lay of exactly what ships: mug, lid and spare seal.
- End frame, 24–30 s. The product on a plain background with its name, two facts and one next step. The Amazon version drops the call to action entirely.
The listing version uses the same footage and runs longer, around 60 to 90 seconds in 16:9 or square. Keep shots 2 to 5 and add what a buyer checks before ordering: taking the lid apart for cleaning, fitting the spare seal, and each color in turn. Film everything for both versions in the same session; matching the light on a second day is harder than it sounds.
Set up a tabletop studio with your phone
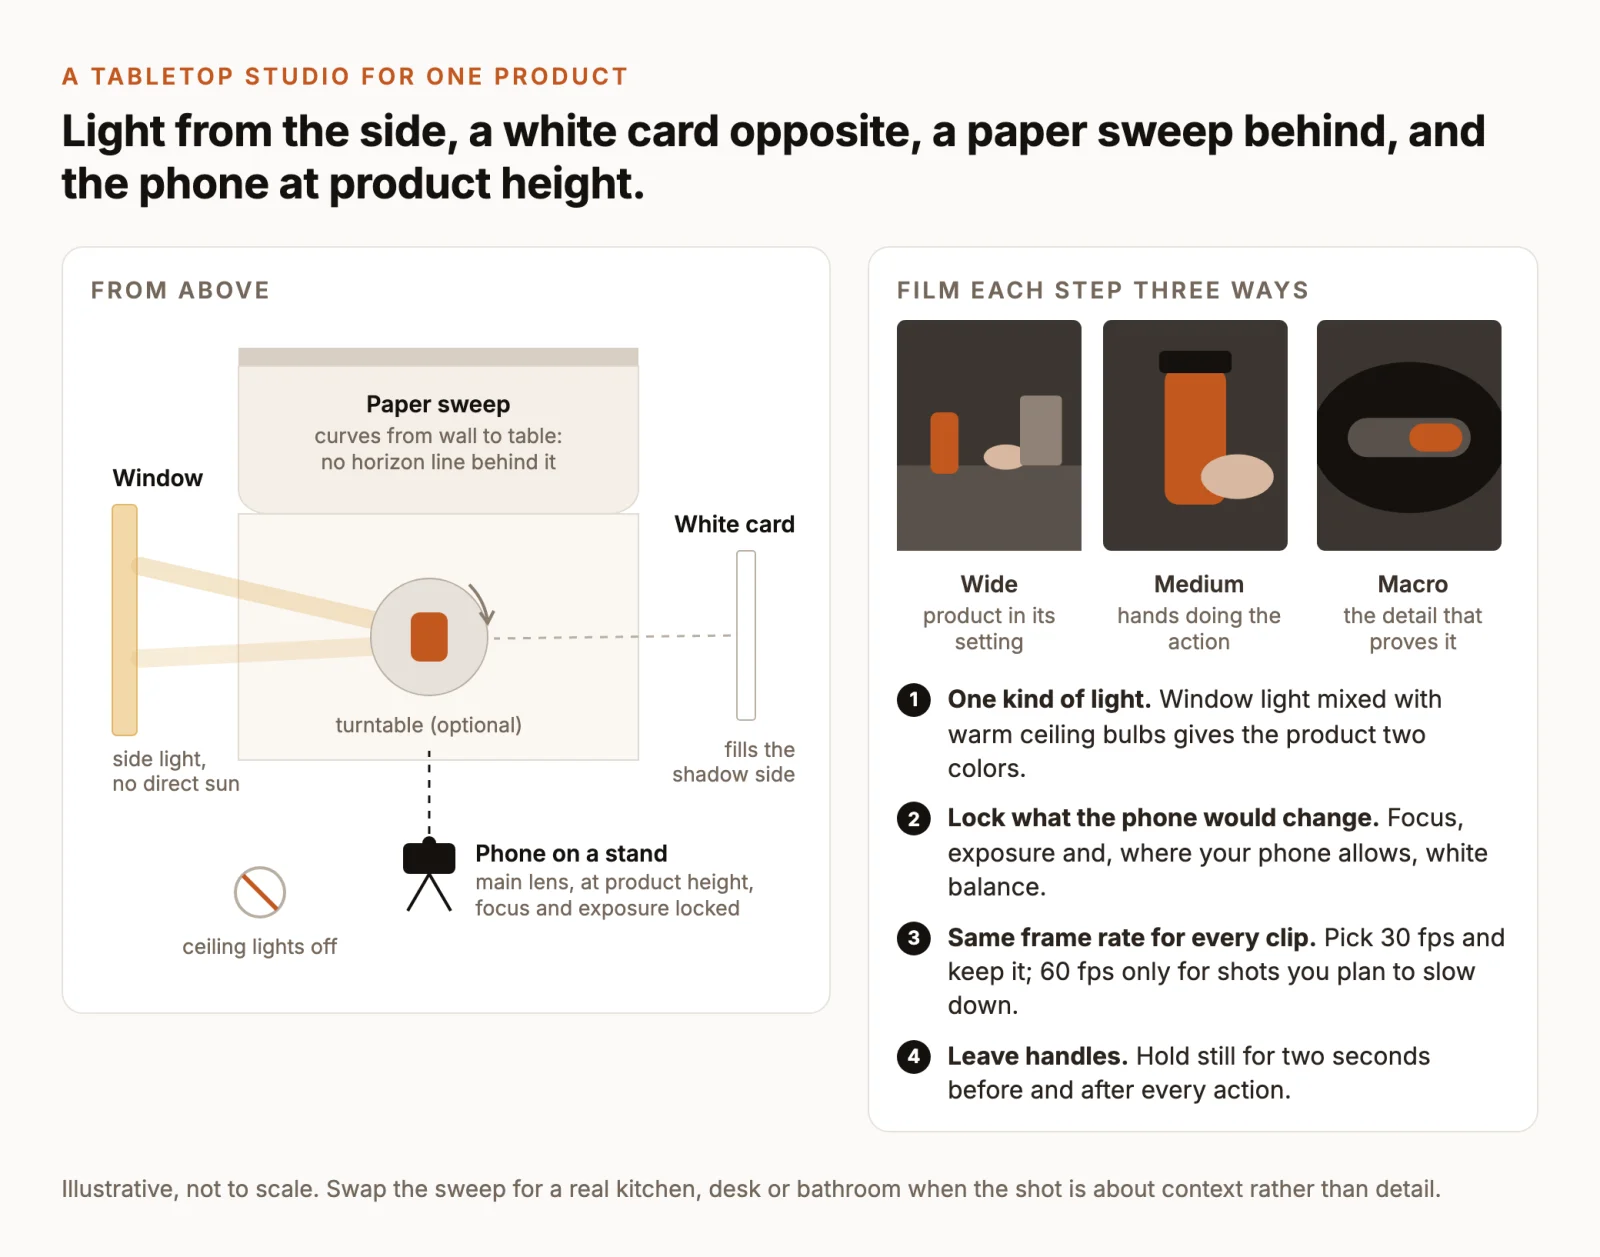
Light from one side, fill the other
Put the table beside a window so daylight falls across the product from one side, and stand a sheet of white card or foam board on the other side to lift the shadows. Avoid direct sun: it makes hard shadows that shift every time a cloud passes. Switch off the ceiling lights, because warm bulbs mixed with daylight give the product two colors at once, and the video has to show the color the shopper will receive.
Glossy, glass and metal products reflect everything around them, including you and the phone. Diffuse the window with thin white fabric or baking paper, and move the white card until the reflection on the product is a clean, bright stripe rather than the room. If you use LED or fluorescent lamps instead of daylight, record five seconds and play it back: some lamps flicker on camera even when they look steady in the room.
Keep the background plain, or real
For detail and 360 shots, tape a sheet of paper or poster board to the wall and let it curve down onto the table. The curve removes the line where wall meets table, so the product sits in clean space. Pick a color slightly different from the product: a white product disappears against white paper but stands out on light gray.
For lifestyle and scale shots, use a real place instead: a kitchen counter, a desk, a car. Clean the product first. Dust, fingerprints and lint that you don’t notice on the table become obvious in a macro shot.
Set the phone up once
- Clean the lens and use the main camera (1x). Move the phone closer rather than zooming in digitally.
- Shoot 4K at 30 fps if you have the storage. The extra resolution lets you crop a vertical version or punch in on a detail later. Use 60 fps only for shots you plan to slow down, such as a pour.
- Lock focus and exposure so they don’t jump when a hand enters the frame. On an iPhone, touch and hold the product on screen until AE/AF Lock appears (Apple); most Android camera apps have a similar lock.
- Lock the rest. On an iPhone, Settings → Camera → Record Video has Lock White Balance, Lock Camera (which stops the phone switching lenses mid-shot) and Auto FPS, which drops the frame rate to 24 fps in low light; turn Auto FPS off to keep every clip at the same rate (Apple).
- Fix the phone in place. A small tripod or a clamp is enough. For overhead flat lays, use a stand with an arm, or put the phone on a shelf above the table.
Turntable, macro and hands
Turntable. For a 360 shot, the product moves and the camera stays still. A cheap rotating stand works; turn it slowly enough that every label can be read, and mark the starting position so the turn ends exactly where it began and can loop.
Macro. Details sell: stitching, a texture, a button, the thread of a lid. On supported iPhones, the camera switches to the Ultra Wide lens for macro and focuses as close as 2 centimeters; you can turn off automatic macro switching if the lens change spoils a shot (Apple). Without macro, shoot from a little farther away in 4K and crop. At this distance every tremor shows, so keep the phone on the stand and move slowly.
Hands. Hands show scale and make the product feel real. Keep them clean, with short neutral nails and no distracting jewelry. Bring them in from the edge of the frame, move more slowly than feels natural, hold the product so the logo and the feature face the lens, and pause for a beat when the action is finished. Proof actions happen at real speed.
Record the product’s own sound
The click of a lock, a pour, a zip or tearing paper tells the viewer something about the product that a picture can’t. Get the microphone close to the action: the phone itself a short distance away, or a clip-on mic taped out of shot. Switch off fans, the fridge and air conditioning, and record ten seconds of silence in the room so the editor has something to fill gaps with. If you narrate, record the voice separately in a quiet room with soft furnishings.
If you want to try this style before filming, the Window-light ASMR unboxing Skill generates it from product and packaging photos.
Shoot by setup, not in story order
Group the shots by camera position so you light each setup once: every macro shot together, then every overhead shot, then the wide shots. Film each shot at least three times. Before you change setups, play the best take back at full size with sound. A soft focus or a reflection of your hand is easy to fix now and impossible to fix later. If vertical social video is your main channel, film the hook and the proof shot a second time with the phone upright rather than relying on a crop.
Edit the footage into a clear product story
Show the product in the first second
Open on the product doing its job, not on a logo or a title card. Amazon’s seller guidance puts it plainly: highlight the most important feature “in the first 5 to 10 seconds” (Sell on Amazon). In a feed, you have less time than that. In the worked example, the bag drop does this job: product, setting and question in one shot.
Cut on movement and leave the proof uncut
Cut while something is moving, such as a hand reaching or the lid turning, and the edit feels smooth. A social cut usually changes shot every two or three seconds; a how-to holds each step until it is complete. Use slow motion only on shots where it helps, such as a pour or a texture. Never slow down, speed up or cut inside a proof shot. If a proof takes too long to show in full, say on screen how much time passed, for example “2 hours later”.
Write the text for viewers with the sound off
Some shoppers watch without sound, which is why Amazon’s seller guidance recommends text overlays for important information (Sell on Amazon). Keep each label short, factual and identical to the wording on your listing: “Holds 16 oz”, not “Huge capacity!”. Show one label at a time, for long enough to read it twice. If someone speaks, add captions as well.
Keep text clear of what the apps draw on top of the video. Meta recommends leaving the top 14%, the bottom 35% and 6% on each side of a 9:16 Reels ad free of text and logos (Meta), and TikTok publishes downloadable safe-zone templates for its ad formats (TikTok).
Let the product sounds lead, with music underneath
Put the product’s own sounds at the front of the mix and the music underneath. Use only music you have the rights to. YouTube blocks any Short longer than one minute that has an active Content ID claim (YouTube), and Amazon’s seller guide warns that a copyright claim can get a video taken down (Sell on Amazon).
Assemble it in ChatCut
You can do all of this in any editor with a timeline. In ChatCut, which runs as a desktop app for macOS and Windows and in the browser, the steps are:
- Create a project and import the clips with My Assets → Upload → Files…, or From phone… to send them straight from your phone with a QR code. Wait for each card to finish processing.
- Rename the clips after the shot list (hook, fill, lock, proof, scale, end frame) from each card’s menu in My Assets, then drag them onto the timeline in order or ask the agent to assemble them.
- Set the shape with Aspect Ratio below the Viewer: 9:16 for the social cut, 16:9 or 1:1 for the listing. Check that every shot is still framed; see vertical framing.
- Add the labels as Motion Graphics, from Templates or by asking the agent.
- Balance the audio. Show the Audio ducking control in the track headers, then make the product-sound or voice track the anchor and the music track the follower, so the music dips when they play.
To have the agent do the first assembly, type @ in the chat box and pick each clip in place of the names below, then replace the labels with facts from your own listing:
Agent edits use ChatCut credits even when all the footage is yours; manual timeline editing, uploads and export don’t. The quickstart covers the first project in more detail. Whatever does the first pass, play the result twice: once with the sound off to check that the text carries the story, once with it on to check the mix.
Use AI for the shots you can’t film
Some shots are hard to get with a phone and a table: a presenter when nobody on the team wants to be on camera, a kitchen or a street you don’t have, or five versions of an ad to test before paying for a shoot. ChatCut’s product Skills generate those as video. You choose or upload a presenter photo, add your product photos and give accurate instructions. Hidden-feature product demo builds a narrated how-to around one feature, Window-light ASMR unboxing a slow tabletop unboxing, Mystery-box product reveal a street-interview reveal, and Step-by-step accessory tutorial a spoken walkthrough with a close-up of each step.
The structure is the same as a filmed demo: context, the control, the mechanism, the result, the result in hand. The difference is what the footage can be trusted to show.
- Generated footage shows; it doesn’t prove. It can show what using the product looks like, but not that your product does it. Keep real footage for every proof shot, such as the leak test, the capacity and the fit, and use generated shots for context, presenters and ad variations.
- Check the small details. Generated video handles light and motion well and small printed text badly, so compare shape, buttons, labels and color with the real product frame by frame, and cut or regenerate anything that doesn’t match.
- A generated presenter isn’t a customer. Don’t caption one as a review or a testimonial.
- Amazon asks for a tag. Amazon’s video guidelines ask sellers to mark files that show photorealistic AI-generated people with the keyword
contains-synthetic-performerin the file’s XMP metadata (Amazon Seller Central). ChatCut’s export settings have no field for it, so add it with a metadata tool after export, and check the current rule in Seller Central first. - It costs credits. Video generation needs a paid ChatCut plan and uses credits; review the estimate before you approve a run.
Both routes end in the same timeline, so you can mix them: a generated presenter for the opening, your own footage for every proof. If you are deciding between avatar presenters, generated people and real creators, our UGC video maker guide compares them, and product ads in ChatCut covers ad-focused workflows.
Export for Amazon, Shopify, TikTok and YouTube
Most products need two masters from the same project: a horizontal or square version for listings and a 9:16 cut for feeds. MP4 with H.264 is accepted everywhere below. The specs were checked on November 4, 2026; platforms change them, so recheck before a large upload.
Amazon listing video
- File: MOV or MP4, up to 1080p, up to 5 GB (Sell on Amazon).
- Length: the same page lists 1 to 12 minutes, yet the example videos in it run 26 to 32 seconds. Upload your cut, and if the form rejects it for length, use the longer listing version.
- Upload: in Seller Central, Catalog → Upload and Manage Videos → Upload video, then add a title, the ASINs, the video type, the language and a thumbnail. You can add up to four videos per ASIN. Approved videos usually appear within three days, and review can take up to seven business days in holiday seasons.
- Placement: the video appears next to the images in the main media block only when the product has fewer than six images.
- Content: leave out prices, promotions, web addresses and calls to action that send shoppers off Amazon (Amazon Seller Central).
Shopify product page
- File: MP4, MOV or WebM, up to 10 minutes, up to 1 GB and up to 4K (4096 × 2160), or a YouTube or Vimeo link instead of a file (Shopify Help Center).
- Resolution: Shopify streams product videos at 480p, 720p or 1080p depending on the shopper’s connection, so a 1080p export is enough for most stores.
- Theme: your theme must support video on product pages; check before you upload.
TikTok and Instagram Reels
- TikTok in-feed ads (non-Spark): 9:16 recommended at 540 × 960 or larger, up to 10 minutes, up to 500 MB, bitrate of at least 516 kbps (TikTok). Spark Ads, which promote an existing organic post, have their own specs on the same page.
- Instagram Reels ads: 9:16, MP4 or MOV, up to 15 minutes, with text kept out of the top 14%, bottom 35% and side 6% (Meta).
- Export: 1080 × 1920 with captions and labels burned into the picture.
YouTube and Shorts
- Uploads: MP4 with H.264, at the frame rate you recorded (YouTube).
- Shorts: on standard channels, square or vertical uploads up to three minutes count as Shorts. A Short longer than one minute with an active Content ID claim is blocked (YouTube).
Export settings in ChatCut
Open Export → Video, choose H.264/MP4, the resolution and the frame rate you filmed at, and the full timeline or a marked zone. ChatCut Desktop, for macOS 13 or later and Windows 10 or later, renders on your computer at up to 4K; cloud exports from the web editor go up to 1080p. Export doesn’t use credits, though free accounts have a 60-minute total allowance for web exports. For the 9:16 cut, switch Aspect Ratio, check the framing of every shot and export again. The export guide lists every option.
Check the video before it goes live
Watch each exported file on a phone, the way shoppers will see it, and check:
- Color. Hold the real product next to the screen. If they don’t match, fix the white balance before anything else.
- Proof. Every claim on screen has a shot that shows it, and no proof shot is cut, sped up or slowed down without saying so.
- Contents. What comes out of the box in the video is exactly what ships.
- Words. Labels match the listing word for word, and the Amazon version has no price, link or “shop now”.
- Sound off, then on. The story makes sense in silence; with sound, the music doesn’t bury the product, and you hold the rights to it.
- The first frame. It shows the product clearly, since it often becomes the thumbnail.
- Generated shots. Details match the real product, and a photorealistic generated person carries Amazon’s synthetic-performer tag.
Fix what you find in the project, export again, and keep the project. The next product can reuse its setup, label style and shot structure.